Christmas-Ready Walls: 7 Weekend Touch-Up Ideas for a Festive Home
Get your home Christmas Wall Painting-ready in a single weekend with simple, high-impact wall touch-ups – from accent feature walls and colour-blocking to stain clean-ups, refreshed trims and brightened corners. The blog walks you through seven practical, DIY-friendly ideas that instantly lift tired spaces and make your rooms look better on camera and in person.
Let’s Begin
Christmas is around the corner. The fairy lights are untangled, the tree is out of storage, the menu is more or less planned… but your walls?
If they still look dull, stained or tired, they will show up in every photo, reel and video call this season.
The good news: you don’t need a full repaint or contractor chaos. With one or two weekends, some simple tools and the right interior paint, you can give your home Christmas-ready walls that feel fresh, cosy and welcoming – without turning your house into a construction site.
In this blog, we’ll walk you through seven practical, high-impact touch-up ideas you can finish in a weekend, perfect for apartments and houses alike.
Why a Weekend Wall Refresh Before Christmas Makes Sense
December is when your home does the most “public” duty:
- This is the holiday season, and your friends and family will visit more often.
- You host dinners, game nights and get-togethers.
- You click, upload and share hundreds of photos.
Tired walls with patches, scuffs, damp marks or faded colour can quietly undo the effort you put into decor. A short, focused paint refresh:
- Instantly lifts the mood of your living and dining spaces.
- Makes decorations look more intentional and premium.
- Helps your home look great on camera – even in close-up shots.
You don’t need to repaint every room. The trick is to focus on key walls and problem areas that make the biggest visual difference.
Step 1: Do a 10-Minute “Guest Eye” Wall Audit
Before you buy even a litre of paint, take a slow walk around your home and look at it the way a guest would.
Check:
- Entrance and foyer – first impressions.
- Living room and TV wall – where people sit, chat and click selfies.
- Dining area – food splashes, finger marks and chair scuffs.
- Children’s rooms and study corners – crayons, stickers, and tape marks.
- Walls near windows and bathrooms – possible damp or peeling.
Keep a small notepad or use your phone and jot down:
- Where you see stains and scuffs.
- Any dull corners that feel gloomy.
- One or two walls that could become feature walls.
This simple audit will guide how you use your weekend:
- What to clean and touch up,
- What to repaint completely, and
- What to simply highlight with colour and light.
7 Weekend Touch-Up Ideas for a Festive Home
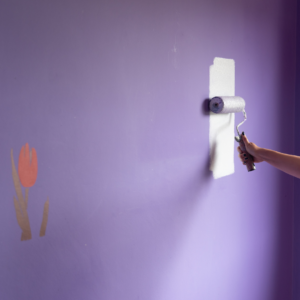
Idea 1: Refresh a Feature Wall with a Festive Accent Colour
If you can only do one big thing, make it this.
Choose one wall in your living or dining room and turn it into a statement backdrop. This will also become the main “photo wall” for your Christmas pictures.
Choosing a Christmas-friendly accent shade
You don’t have to go for a loud red that you’ll regret in January. Instead, opt for richer, versatile tones that feel festive now and elegant later:
- Deep wine or burgundy – cosy and luxurious behind a sofa or dining table.
- Forest green or emerald – classic Christmas, but still sophisticated.
- Navy, ink blue or deep teal – dramatic and perfect with warm lights.
- Soft gold, beige or greige – subtle glow if you prefer understated décor.
Keep the other three walls neutral (off-white, soft cream, very light grey) so the room still feels spacious and airy.
How to paint a feature wall in a day
- Prep the surface
- Wipe off dust and cobwebs with a dry cloth.
- Lightly sand flaky areas and smooth out minor imperfections.
- Mask carefully
- Use painter’s tape along the ceiling line, skirting, sockets and switches.
- Prime where needed
- If you’re changing from very light to very dark (or the reverse), apply a suitable primer first for better coverage.
- Apply two thin coats of your accent paint
- Use a roller for large areas and a brush for edges.
- Allow recommended drying time between coats.
- Remove tape before the paint fully cures or dries
- This stops it from tearing or peeling the fresh paint.
By the evening, you’ll have a completely new backdrop that makes your tree, fairy lights and decor pop.
Idea 2: Erase Stains, Scuffs and Kid Doodles in High-Traffic Zones
You’d be surprised how much cleaner and newer your home looks when the worst marks simply disappear.
Focus on:
- Walls near switches and doorways.
- Staircases and corridor walls.
- Children’s play and study areas.
Clean first, then touch up
- Dust the walls gently with a microfibre cloth.
- Spot clean stains with a mild soap solution and a soft sponge.
- Don’t soak the wall; use just enough moisture.
- Dab rather than scrub to avoid creating shiny patches.
- If a stain refuses to leave, lightly sand that area and wipe away the dust.
- Touch up with leftover paint in the same shade and finish.
- Use a small brush or foam roller.
- Feather the edges so the repair blends into the surrounding wall.
If your walls are painted with a washable interior emulsion, this step becomes very quick and satisfying. Even an hour or two of focused work can make your walls look as if they’ve had a mini makeover.
Idea 3: Try Simple Colour-Blocking for an Instant Designer Look
If you enjoy something a bit more creative, colour-blocking is your friend.
Instead of repainting a whole wall, you paint just a section of it in a different colour to create a designer effect.
Easy colour-block ideas for Christmas
- A wide horizontal band at mid-wall height behind the dining table.
- A tall vertical block behind a bar trolley, console or bookshelf.
- Two-toned walls in a children’s room (lighter on top, deeper shade at the bottom).
Choose colours that feel festive with lights, but stylish on ordinary days:
- Sage green, dusty rose, muted blue, warm terracotta, charcoal, etc.
How to do it neatly
- Mark your shape or band using a pencil and a spirit level.
- Apply painter’s tape along the edges.
- Paint within the taped area with a small roller.
- Peel off the tape while the paint is still slightly tacky.
You get sharp, crisp lines that look like a professional designer planned them – perfect behind your Christmas tree or a wall full of frames.
Idea 4: Add Gentle Texture with Sponge or Dry-Brush Techniques
Flat, plain walls sometimes look lifeless in photos, especially at night. A bit of subtle texture can add depth and character.
You don’t need to invest in heavy textured plasters. Two DIY-friendly techniques work well for a weekend:
Sponge effect
- Take a clean, slightly damp sponge.
- Dip it into a tray with diluted paint (one shade lighter or darker than your wall).
- Dab gently in a random pattern, rotating the sponge so it doesn’t look repetitive.
Dry-brush effect
- Dip a broad brush in paint, then wipe most of it off on cardboard.
- Lightly drag the nearly dry brush across the wall, vertically or in criss-cross strokes.
Use these techniques on a small portion of a wall, like behind a console table, reading chair or sideboard, rather than all around the room. This keeps the effect elegant, not overpowering.
Idea 5: Brighten Dull Corners and Niches
Every home has a few dull corners that look forgotten – often where decorations end up being placed at Christmas.
Instead of fighting them, turn them into focal points.
Make corners Christmas-ready by:
- Painting the inside of niches or recesses in a darker, richer shade than the main wall.
- Refreshing floating shelves with a contrasting colour or wood finish.
- Creating a mini accent panel behind your nativity scene, lanterns or candles.
For example, if your walls are a soft cream, a deep bottle green or navy niche with warm fairy lights can look incredibly festive and cosy.
Idea 6: Revive Skirting, Door Frames and Window Trims
Sometimes the walls look fine, but the trims around them give away the age of the paintwork.
Refreshing:
- Skirting boards,
- Door frames, and
- Window trims
can make the entire room look newly finished.
Colour ideas that always work
- Soft, clean white trims for a classic, crisp look.
- Charcoal or deep grey in modern spaces for a subtle, sleek frame.
- Clear or tinted wood finishes on natural timber doors and frames.
Use a durable, easy-to-clean paint or PU finish for these areas, as they tend to catch dust, scuffs and fingerprints. Mask the adjoining walls thoroughly so you can work quickly without fear of messy edges.
Idea 7: Use Lighting and Decor to Show Off Your Fresh Walls
Once the paint is dry, it’s time to style your walls so all your effort shows in photos and in person.
Styling tips that flatter your touch-ups
- Place your Christmas tree or main decor cluster against your newly refreshed wall.
- Hang art, family photos or Christmas prints at eye level to draw attention.
- Use warm-white fairy lights instead of harsh, cool lighting.
- Add mirrors opposite windows or fairy lights to bounce light around.
- Repeat your accent colour in cushions, throws, table runners or baubles for a pulled-together look.
Good styling doesn’t just hide small imperfections; it makes your home feel intentionally decorated, not just seasonally cluttered.
Choosing the Right Interior Paint for Quick Christmas Touch-Ups
All of these ideas become much easier if your walls are coated with a high-quality interior paint system that’s designed for busy homes.
Look for:
- Washable, stain-resistant emulsions – so fingerprints and food splashes can be cleaned without leaving marks.
- Good hiding power and opacity – fewer coats needed to cover old shades or stains.
- Low odour and low VOC – especially important if you’re painting close to Christmas and still living in the space.
- Smooth, even finish that photographs well, both in natural and artificial light.
This is exactly where MRF Vapocure Paints comes in. Our interior ranges are developed from decades of coatings expertise, adapted specifically for Indian homes that see constant movement, celebrations and heavy use. Every product is crafted to give you deep, enduring colour, solid coverage and surfaces that are easy to clean and care for day after day.
Wrapping Up with a Handy Tip
A Simple Weekend Plan to Follow
To keep things manageable, you can divide your work like this:
Saturday
- Morning: Wall audit + cleaning + sanding where needed.
- Afternoon: Paint the feature wall or colour-blocked area.
- Evening: First coat on trims, niches or shelves.
Sunday
- Morning: Second coats where required + touch-ups on stains and scuffs.
- Afternoon: Remove tape, clean up, and move furniture back.
- Evening: Style with lights, art and décor.
By Sunday night, you’ll be sitting in a living room that looks fresh, intentional and Christmas-ready.
FAQs
1. How close to Christmas can I safely paint my walls?
If you use low-odour water-based interior paints, you can usually paint one to two weeks before Christmas without any issues. For small touch-ups and a single feature wall, even the weekend just before can work, as long as you allow proper drying time and keep the space ventilated.
2. Which wall colours look festive but still good all year?
Great all-year choices include:
- Deep green, teal or navy as feature walls.
- Warm neutrals like beige, cream, greige and soft taupe.
- Charcoal or ink blue behind a TV unit or sofa.
Bring Christmas in through accessories – red cushions, gold accents, plaid throws, candles and lights – so your walls remain versatile after the season.
3. Can I paint over damp patches just before Christmas?
It’s better to avoid it. Painting over active damp or mould usually leads to:
- Blistering and peeling, and
- Brown or yellow stains reappear quickly.
If you spot damp:
- Identify and stop the source of moisture.
- Let the wall dry completely.
- Use appropriate waterproofing and repair products before repainting.
For this year’s celebrations, focus on dry, sound walls, and plan a proper damp treatment once the festive rush is over.
4. I don’t have the original paint shade. Will touch-ups look patchy?
Small repairs might blend in, but larger touch-ups can show as patches if the colour match isn’t accurate.
You can:
- Repaint the entire wall or section instead of just small spots.
- Turn the situation into an opportunity for a feature wall or colour-blocked design.
- Take a sample of the existing paint (from a hidden area) to your paint dealer to get a closer match.
5. Is it safe to paint at home with children and pets around?
Yes, if you choose low-VOC, low-odour paints and:
- Keep windows open for ventilation.
- Restrict children and pets from freshly painted areas until they’re dry.
- Store paint, thinners and tools safely out of reach.
Plan your work in phases so parts of your home remain fully usable while other areas dry.